[iPhone] HelloWorld
1.アプリケーションクラス
int main(int argc, char **argv) {
NSAutoreleasePool *pool = [[NSAutoreleasePool alloc] init];
return UIApplicationMain(argc, argv, [MyApp class]);
[pool release];
}
UIApplicationがアプリケーションのインスタンスとなる.
main文の中でallocされる.
2.アプリケーションクラスの実装
初期化は,アプリケーション起動後に呼ばれるメソッド,applicationDidFinishLaunchingに実装するのが良いようだ.
@implementation MyApp
- (void) applicationDidFinishLaunching: (id) unused {
// Get screen rect
CGRect  screenRect;
screenRect = [UIHardware fullScreenApplicationContentRect];
// Create window
UIWindow*   window;
window = [[UIWindow alloc] initWithContentRect:screenRect];
// Create text view
UITextView* textView = [[UITextView alloc] initWithFrame:[window bounds]];
[textView setText:@"Hello World?"];
// Set content view
[window setContentView:textView];
// Show window
[window orderFront:self];
[window makeKey:self];
[window _setHidden:NO];
}
@end
HelloWorldでは,applicationDidFinishLaunchingで,Windowを作成し,その上にUITextViewを作成し,Hello World?の文字列をセットしている.
3.ナビゲーションバー
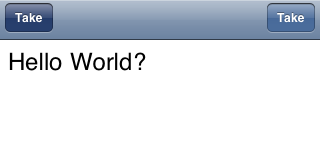
iPhoneで特徴的な上部のバーをナビゲーションバーと呼ばれるらしい.
それもapplicationDidFinishLaunchingで実装する.
48は,ナビゲーションバーの高さだ.
// Make size
CGRect sizeTextView = CGRectMake(0, 48, 320, 480);
CGRect sizeNavigationBar = CGRectMake(0, 0, 320, 48);
// Set content view
textView_ = [[UITextView alloc] initWithFrame:sizeTextView];
[textView_ setText:@"Hello World?"];
[window_ setContentView:textView_];
// Make navigation var
UINavigationBar*bar = [[UINavigationBar alloc] initWithFrame:sizeNavigationBar];
[bar showButtonsWithLeftTitle:@"Take" rightTitle:@"Take" leftBack:NO];
[bar setBarStyle:5];
[bar setDelegate:self];
[window_ addSubview:bar];
ナビゲーションバーに割り当てられたボタンが押されたときのイベントは,delegateで処理する.
navigationBarメッセージを実装する.
- (void) navigationBar:(UINavigationBar*)navbar buttonClicked:(int)button {
// Set Message
[textView_ setText:@"Push Navigation Bar Button."];
}
ボタンを押すと,textViewに文字列がセットされる.
ウマーーーーー.
4.スクリーンショット
お気づきだろうか?
上のスクリーンショットはどうとったのだろうか?
はい,スクリーンショット実装しました.
iPhone自体にsshでログインしてスクリーンショットを取るプログラムはあるのだが,ちょっとイヤ.
ということで,自分で作りたいなぁ・・・・と探していた.
昨日あたりにグダグダになりながら,CoreGraphicsあたりのライブラリを探し回り,見つけますた.スクリーンショット生成方法.
間違ってるところ多々の可能性もありますが,一応モメ.
CGRect   bounds = [UIHardware fullScreenApplicationContentRect];
CGImageRef image = [window_ createSnapshotWithRect: bounds];
char buff[512];
// Make file name
snprintf( buff, sizeof(buff), "/tmp/%d.png", (int)[[NSDate date] timeIntervalSince1970] );
CFStringRef path = CFStringCreateWithCString( nil, buff, kCFStringEncodingASCII );
CFURLRef url = CFURLCreateWithFileSystemPath( nil, path, kCFURLPOSIXPathStyle, 0 );
// Make kUTTypePNG -> public.png
CFStringRef type = CFStringCreateWithCString( nil, "public.png", kCFStringEncodingASCII );
size_t count = 1;
CFDictionaryRef options = NULL;
// Writing
CGImageDestinationRef dest = CGImageDestinationCreateWithURL(url, type, count, options);
CGImageDestinationAddImage(dest, image, NULL);
CGImageDestinationFinalize(dest);
// Release
CFRelease(dest);
CGImageRelease( image );
CFRelease( url );
CFRelease( type );
1970から数えたm秒?でファイル名をセットして,/tmpにファイルを作成しています.
結構面倒くさかったのが,CFStringCreateWithCStringでファイルの保存形式をセットするところ.この文字列定数には,CoreGraphics?の定数をそのまま入力できない.
そこで,ムリクリ入れてみた.動いた.結果オーライ.
よし!これで大体のプログラミングの道具は揃った!!
気がする.